Monday, February 20, 2012

Sword in the Stone Night


"Sword in the Stone" night began with us making drinking glasses. I tried to find goblets but couldn't so I settled with these glasses I got at Target for about a $1 per glass! We hot glued gems around the top of the glass, leaving about an inch of space for our lips. These glasses are hand washable and the kids love drinking out of their princess glasses. :)


Next we made crowns from construction paper and gems.


After the crafts we had our meal. First we had an appetizer of cheese cubes, grapes, torn bread with parmesan garlic oil dip. We bought old fashioned bottled root beer which we drank out of our decorated glasses.


For dinner we ate chicken legs, corn on the cob, and onion roasted potatoes. No forks allowed!


I made tunics from plastic tablecloths and the kids wore them for the sword battle we had following the movie. I picked up the swords at Target weeks ago and pulled them out for this! The kids had a blast!!! They could not stop laughing!


My husband even joined in for the sword battle... Both sides fought well but in the end... Lexi wins!!!


Thursday, February 16, 2012

Homemade Laundry Detergent

I love this detergent! It works great, my clothes come out as clean as with regular detergent and they smell so clean!!! I wasn't a fan of powdered laundry detergents but this one is fantastic!

Homemade Powdered Laundry Detergent
1 Ivory, Fels-Naptha, Sunlight, Kirk's Hardwater Castile or Zote soap bar
1  Cup - Arm & Hammer Super Washing Soda (cannot substitute baking soda)
½  Cup Borax
½ cup Calgon water softener

Break soap* into pieces and process in a food processor until powdered. Mix all ingredients. For light load, use 1 Tablespoon. For heavy or heavily soiled load, use 2 Tablespoons.

Yields: 3 Cups detergent. (Approx. 40 loads)
 Recipe cost approx. $2-3 per batch.

*I recommend leaving the soap out a day or two to dry out because it is easier to process in a food processor dry!

Tip: Use vinegar as the fabric softener.


My grocery list:
10 bars of Ivory soap: $3.31
1 box Arm & Hammer Super Washing Soda: $5.99
1 box Borax: $4.99
1 box Calgon water softener: $6.99

I made 240 loads worth of detergent and I used:
6 bars of Ivory - $1.99
1 box of washing powder: $5.99
About ½ the box or borax: $2.50
3/4 the box of Calgon: $5.24
Totaling to: $15.72 which is $2.62 per batch, that’s less than 10 cents per load! 


Personal Review:
For my birthday, we went to IHOP and my kids enjoyed their 'The Lorax'  breakfasts. Of course we and planned to be out most of the day and my daughter had to order the messiest food! She ordered the blueberry cake cone and of course got blueberries on her dress! We were able to get it kind of out and decided to just go about our day with her wearing the dirty dress, since our day was packed and she'd probably get it dirty later anyway.

After we got home, before I had her change, she did get it dirtier, she split red koolaid on it! At his point I was hoping it wasn't permanently stained! I threw it in the laundry using this detergent and hoped for the best. Well, it came out perfectly clean, no hint of the stain! Now I wish I snapped a before picture, but here's the after! I think this works better that other detergents I've used (All, Tide, Gain, Method, store brands).


Pocahontas Night

We started our Pocahontas Day with a late breakfast of Native American Fry Bread. 

Here's the recipe I used, I got it from All Recipes but altered it a little because it needed more flour to not be sticky and I wanted it to be sweeter so I put honey in the dough. 
Ingredients:
4 1/2 cups all-purpose flour
1/2 teaspoon salt
1 tablespoon baking powder
1 1/2 cups warm water
¼ cup honey
4 cups oil or shortening for frying

Directions:
Combine flour, salt, and baking powder. Stir in the honey and the water. Knead until soft but no longer sticky. Shape dough into balls about 3 inches in diameter. Flatten into patties 1/2 inch thick and make a small hole in the center of each patty. Fry one at a time turning to brown on both sides. Drain on paper towels.


Next we made hair feathers and headdresses.


We made a totem pole of animals that represented us.

The Monkguin (Penguin/Monkey) is my husband. I called him a Monkguin years ago because he walks like a penguin with his toes pointing outward and he acts like a monkey...

The Raccoon is Katelynn. We chose the Raccoon for Katelynn because she is curious and loves cleanliness. She loves trying new things, she's very adventurous. She also hates being dirty; she won't even lick food off her fingers, they need to be wiped clean!

The owl is Lexi. Lexi chose the Owl because she says she's wise. Lexi is a smart cookie and sometimes she says things that are beyond her years. She has an excellent memory, high vocabulary skills, and is very inquisitive which I think leads her to say things most 7 year olds wouldn't. 

The Turtle is me. I chose the turtle because the Turtle symbolizes adaptability, I am able to adapt to whatever life throws at me including numerous moves because my home is wherever my family is.  I also chose the Turtle because I am  
                                          very shy. When I am uncomfortable or insecure, I withdraw into my 'shell.' 


We also made dream catchers.


We also played with Pocahontas paper dolls and a Pocahontas paper playset (which is available here under constructibles).


For a snack while we made our crafts, we ate homemade tortillas in leaf shapes served with salsa and cheese dip. (Recipe available here from FamilyFun.com)


For dinner we made an abbreviated Thanksgiving feast: turkey, cranberries, mashed potatoes, and corn on the cob. 

Yarn Bottles and Paper Roses

I got the idea of a yarn wrapped bottle off Pinterest, which originated from More Design Please. I also found online instructions to make paper roses at Dozi Designs.


I loved how these looked. I also loved them on the branches but I live in Alaska and there is so much snow on the ground right now I don't think I could find fallen branches to use. So I improvised and made my own branches using bamboo skewers and brown yarn. I think they turned out pretty good! 


I made this entire project I made with materials on hand and it only took me 2 hours to complete! Here's my finished product:

Valentines Crafts: Homemade Playdough

For Valentines Day, I wanted to send my daughter to school with more than the traditional store bought Valentines Day cards so we decided to make homemade playdough to accompany her homemade valentines!


Simple Cooked Play Dough


3 cups of flour
1 1/2 cups of salt
3 cups of water
2 Tablespoons vegetable oil
1 Tablespoons cream of tarter
Red food coloring

In a saucepan, mix the dry ingredients. In a measuring cup, mix the wet ingredients. Pour the wet ingredients into the saucepan and mix until well combined. Cook the ingredients over medium heat for about 1-2 minutes until dough forms a skin and pulls from the sides of pan. Let cool and knead for 2 minutes. Store in an airtight container.

Here's my finished product.


Since I was giving them as gifts for Valentines day I made hearts...


And bagged them in Valentines cellophane bags!

Tuesday, February 14, 2012

Egg in a Nest

This is my first horrible attempt at an Egg in the Nest! I made it again and it came out PERFECT but I forgot to take a picture! I know I'm going to try to make it again because it is a delicious and simple breakfast item! I'll try to get a better picture :)


A recipe for this is very simple!

You need:
sliced bread
eggs
butter

Using a glass or cookie cutter cut a hole in the center of the bread. Melt about a tablespoon of butter in a pan over medium heat. Fry the bread and the cut out in the pan for 1-2 minutes then flip (you may need to add a little more butter). Lower the heat and crack and pour an egg into the hole. Cover the pan and cook the egg until it is firm, about 3 minutes. If you want an over-easy egg, flip the bread-egg over and cook for another minute or so. Enjoy!


Homemade Alfredo Sauce

Here's my recipe for simple Alfredo sauce. It makes a lot but we like a lot of sauce on our pasta and it graciously covers 1 box of fettuccine pasta.

Alfredo Sauce

1 stick butter, cut into pieces for quicker melting
½ cup flour
2-4 cups cream or milk
1 cup parmesan cheese
3 large cloves garlic, minced (I like garlic so I use a lot, you can adjust to taste)
Salt and pepper to taste

Melt butter and flour over medium-low heat for a minute or two until well blended, do not brown.  Slowly add the milk, the mixture may clump but keep mixing and it will become smooth and creamy. Add milk until desired consistency is reached. I prefer thick Alfredo sauce, but some may like it a bit runnier.  Add the parmesan cheese and gently stir until melted. 

Valentine's Day Family Dinner

Since we have two children, it can be difficult for my husband and I to go out and going out to a nice restaurant on Valentine's Day, let alone any day, is not worth the hassle or the expense. So instead, we made a nice dinner at home with dessert and we watched one of our favorite shows afterwards.

I decorated with a large Valentine's Day sign.


For dinner I made Shrimp Fettuccine Alfredo, garlic breadsticks, and a salad. I don't have a picture but I will include my recipe for homemade Alfredo Sauce. It's so simple and delicious, I never buy store bought Alfredo anymore.

For dessert we made strawberry cupcakes. We made the boxed kind, they we're simpler since I was busy all morning. My eldest daughter and I had fun decorating them!

Valentine's Crafts: Homemade Valentines

This year, my daughter and I made homemade Valentine cards! We made owls, fish, and elephants. I got the fish and elephant valentine idea from Family Fun, the owls were my idea!

To make the elephants and the fish:

Materials: 
card stock
scissors
glue stick
googly eyes
colored markers
small heart stickers (optional)

Cut a medium heart shape template about 2 1/2 inches by 2 1/2 inches. Trace this shape for the second elephant template, but add a curved trunk. Cut a large heart template about 4 inches by 4 inches. 

Now that you have your templates, you can start cutting out your shapes. 

For each elephant you will need 2 medium heart shapes for the ears and 1 face/trunk shape. Glue the tips of two heart-shaped ears to the back of the head. Free hand small hearts or use small heart stickers and place on ears and trunk as shown. Attach googly eyes and add your message. I added mine to the back since I used glitter card stock.  I used the message 'You're unforgettable.'


For the fish you need to use the large and medium heart template. For each fish you will need to cut out 2 large hearts and 1 medium heart. Glue the two large hearts with the top of the hearts overlapping as shown and add the tail. Lastly, add the googly eyes and your message. I used the message 'You're oceans of fun.'


The owls are harder to explain. I will try to add a template later since I free handed all of the shapes.

To make the owl you need to free hand a template for the owl shape. Then freehand a long heart shape for the chest piece. You will need a circle template for the eyes, a triangle template for the nose and free handed mini hearts for the claws. To assemble, glue the chest piece to the body, add the eyes and the nose and claws. Lastly dray a pupil for the eye, we used glitter paint because my daughter wanted it to be all glittery. 

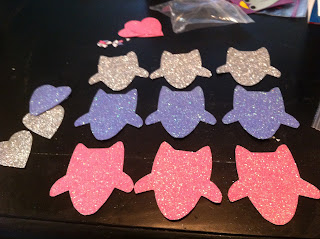
Here's a picture of the larger basic shapes.  


Here's the finished product:

Monday, December 20, 2010

Bantha Plush and Tusken Raider 'Ugly Doll'

Here is my Bantha plush (how-to available at http://www.starwars.com/kids/do/crafts/f20081124.html) and a Tusken Raider 'ugly doll', which I designed myself!

Instructions for the Tusken Raider 'Ugly Doll' are kind of difficult to explain since I designed it as I sewed. However, I'm going to attempt to explain as well as I can.

1. For the form, I used light brown fleece which I free handed on doubled fleece which I just stitched together, flipped inside out then stuffed.
2. For the tunic I used tan fleece. I made the tunic by tracing the form and cutting it out slightly larger, so it would fit over the form; I just stitched it and flipped it right side out.
3. For the robe and head wrap, I used tea dyed gauze. The robe was difficult and it's the most difficult to give instructions for. I made 4 rectangles of overladen gauze, two small rectangles for the arms and two large for the robe sides. I did this by folding gauze over and over on itself and stitching it with a zig-zag stitch with light tan thread. I then stitched the two large pieces together, made tubes for the sleeves and attached the sleeves to make a complete robe. I think that's the best I can explain the jacket.
For the head wrap I wrapped and sewed as I went to get good coverage and to get it wrapped how I wanted it to look.
4. Now for the details. For the sash I just used a strip of brown material. The mouth mask was made with a remnant of tan fleece and black embroidery thread. And for the face, I used two sizes of bolts for the eyes and face tubes which I stitched on with clear thread.
 
:) ENJOY!!!


Here's a picture of a Bantha and a Tusken Raider from the films: 


Here is my Bantha from different angles:


Here is my Tusken Raider front and back! I made mine much cutesier than the 'real' Tusken Raider. I stylized it like those Ugly Dolls!