Friday, May 25, 2012
Etsy Shop is OPEN
My Etsy shop is now open! Please visit it at http://www.etsy.com/shop/HandInHandCreations
Saturday, May 12, 2012
Anchorage Citywide Cleanup
Today my mom, sister, and I participated in the Anchorage Citywide Cleanup at my school, Ursa Major. We had a lot of fun picking up trash at my school! I even won a iPod shuffle for participating, mostly because I was the only student to show up! My sister was given a 4 foot snake for helping out.
We are also going to clean up our neighborhood this weekend :) Working to make our world a more beautiful place.
.jpg)
.jpg)
.jpg)
.jpg)
We are also going to clean up our neighborhood this weekend :) Working to make our world a more beautiful place.
.jpg)
.jpg)
.jpg)
.jpg)
Friday, May 11, 2012
Bracelets for Charity
I am making bracelets this summer to sell for charity. I am making glass bead animal species bracelets to raise money for National Wildlife Federation. I am also making pop tab bracelets to raise money for Heifer. I haven't started making them yet but we have most of our supplies. After I make a few, I am going to open a shop on Etsy. :) I am very excited and I cannot wait to start making and selling my bracelets to raise money for my charities!!!
.jpg)
.jpg)
.jpg)
.jpg)
Thursday, March 22, 2012
Money Making Ideas
I'm a stay at home mom and student, I don't have an income but I do look for ways to make a little extra money.
Mystery Shopping:
I've signed up for many of these but I live in Alaska and there are not many opportunities here! Additionally I suffer from Social Anxiety Disorder so ones that involve too much social interaction I can't do. Hopefully one day I can and 'Mystery Shopping' is helpful for me to force myself outside my comfort zone!
Mystery Shoppers Provider Association
MSIS Shopper
ICCDS
Beyond Hello
KSS International
Market Foce
Shop N’ Chek
National Shopping Service
Trend Source
Online Surveys:
You won't make much but you could probably turn out $5-10 a week!
SurveySavvy
Synovate Global Opinion Panel
MySurvey
American Consumer Opinion
SurveySpot
SurveyHead
Toluna (points for polls as well)
Earn Money for Searching the Web and more
Earn points searching and shopping online. With Inbox Dollars and MyPoints you also can also earn points reading emails.
Inbox Dollars
MyPoints
Swagbucks
*More about Swagbucks:
Being a student, I do a lot of research so Swagbucks is just awesome because I make money doing my homework by using Swagbucks as my main search engine. With one research paper, I made enough points for a $5 Amazon gift card!
There are many ways to make Swagbucks: searching, NOSO, daily polls, downloading the toolbar, filling out trusted surveys, watching short videos, playing games, doing tasks, and even printing and using coupons. Every 450 points you can earn a $5 gift card, such as the Amazon gift card, or you can redeem points for other items. You can get bigger gift card amounts but the $5 is a better deal for the points!
You can easily get over 20 Swagbucks a day in about 10 minutes or less. (Which would equal more than enough for a $5 Amazon gift card)
Search - you can easily get 15+ Swagbucks per day
NOSO (you can skip all of the offers) — 2 Swagbucks
Take the Daily Poll — 1 Swagbuck
Login Via the Toolbar — 1 Swagbuck
Click on Trusted Surveys — 1 Swagbucks
Watch 10 videos on Swagbucks TV - 3 Swagbucks
Make Money on your Phone
I've recently discovered there are apps on your phone where you can earn points for prizes, such as gift cards. Additionally some survey sites also have apps to do surveys on the go.
Field Agent (mystery shopping app)
WeReward (Check-ins and product scans)
CheckPoints (Check-ins and product scans)
App Trailers (watch app trailers and download apps for points)
Locately
Thumbspeak
SurveyApp
Toluna
iPoll (SurveyHead)
Tuesday, March 20, 2012
Bayou Bread Pudding
This pudding reminded me of the bread pudding I used to eat at my uncles cafeteria! Yum! We served our bread pudding with green vanilla pudding (the Jello 'color change' kind). We named our green pudding 'Swamp Pudding.' The kids took to the green pudding better than my husband and I. It was weird eating something that green and oozy!

Butter, for greasing the pan
9 cups dry bread, in 1-inch cubes (if bread is not dry toast the bread until dry)
1 cup pineapple cubes
1/2 cup raisins
1 teaspoon cinnamon
1/2 teaspoon nutmeg
pinch of salt
3 cups milk
5 tablespoons butter
1/2 cup packed light brown sugar
3 large eggs
1/2 teaspoon vanilla extract
Caramel sauce or whipped cream
Preheat the oven to 350°F. Grease an 8-inch baking pan
Combine bread cubes, pineapple, and raisins in a large mixing bowl and sprinkle on the cinnamon, nutmeg, and salt. Toss all of the ingredients together.
In a saucepan, combine milk and butter and warm them over medium-low heat. Remove from heat once the butter melts and stir in the brown sugar. Pour the milk mixture over the bread and stir until completely moistened. Let it sit for 5 minutes to absorb all of the liquid.
While waiting, in a small bowl whisk together eggs and vanilla extract. Gently add egg mixture to the bread mixture. Pour the pudding into the greased pan and bake for 45-60 minutes. Serve the pudding warm and cut into squares topped with caramel sauce or whipped cream.
Recipe adapted from the book: Disney's The Princess and the Frog Tiana's Cookbook Recipes for Kids. Copyright © 2009 Disney Enterprises, Inc. Published by Disney Press, an Imprint of Disney Book Group.
Tricolor Vegetable Pasta with Andouille Sausage in Garlic-Oil Sauce
I recently bought Tricolor Rotini and I decided to make Tricolor Vegetable and Sausage Pasta in Garlic-Oil Sauce. I used Andouille sausage because I like the flavor and I had some left over from a previous recipe!
This was very quick to make. Have the pasta cooking while you slice and cook the vegetables and sausage and make the garlic sauce. I think this recipe took me only 15-20 minutes!

Salt, about a teaspoon but add more according to taste
pepper, to taste
Cook the tricolor rotini according to package instructions.

While rotini is cooking, heat about a tablespoon olive oil in a deep skilled over medium-high heat. Place the bell peppers, onions, and sausage in the skillet and season with garlic, salt and pepper. Cook covered, stirring occasionally, until onions are transparent, peppers are tender, and the sausage is thoroughly heated. Add about 1/2 cup olive oil. Re-season to taste, if necessary.

Drain the pasta and place back in pot. Pour the vegetables, sausage, and garlic-oil sauce over the pasta and mix well. Enjoy!
This was very quick to make. Have the pasta cooking while you slice and cook the vegetables and sausage and make the garlic sauce. I think this recipe took me only 15-20 minutes!

1 red bell pepper, sliced
1 green bell pepper, sliced
1 onion, sliced
1/2 pound cooked Andouille sausage, or any other sausage, sliced
1 box Tricolor Rotini
1/2 olive oil
1 teaspoon garlic powderSalt, about a teaspoon but add more according to taste
pepper, to taste
Cook the tricolor rotini according to package instructions.

While rotini is cooking, heat about a tablespoon olive oil in a deep skilled over medium-high heat. Place the bell peppers, onions, and sausage in the skillet and season with garlic, salt and pepper. Cook covered, stirring occasionally, until onions are transparent, peppers are tender, and the sausage is thoroughly heated. Add about 1/2 cup olive oil. Re-season to taste, if necessary.

Sunday, March 18, 2012
Turkey Shepherd's Pie
 I never had Shepherd's pie before and this recipe was amazing!!! My husband LOVED it! This recipe makes 6 servings, which for my family was enough for dinner with enough left over for lunch the next day for me and my youngest (everyone else is gone).
4 large potatoes, peeled and cut into chunks
salt
2 tablespoons olive oil
4 slices of bacon, chopped
2 pounds ground turkey
pepper
2 onions
2 carrots
2 tablespoons Worcestershire sauce
2 teaspoons poultry seasoning
2/3 cup milk, cream, or half-and-half
1 egg beaten
2 tablespoons butter
2 tablespoons fresh chives
1 cup frozen peas
1 teaspoon paprika
Place potatoes in a pot, sprinkle with salt, and cover with water. Cover and bring to a boil over high heat. Cook the potatoes until tender, about 15 minutes.

Preheat the broiler to high.
 Drain the potatoes and place back in the warm pot. Smash the potatoes with a potato masher. Add in 1/3 cup milk, egg, butter, chives, salt and pepper and continue mashing until potatoes are almost smooth.
  Uncover turkey and turn off the heat, stir in the peas and 1/3 cup milk. Scrape the turkey mixture into a casserole dish and top with a thick layer of mashed potatoes. Brown potatoes under the broiler for 5-10 minutes. When done, sprinkle with paprika. Enjoy!
Avgolemono Soup
6 cups chicken broth
1/2 cup orzo (you can substitute rice)
salt and pepper to taste
1 chicken bullion cube
3 eggs
1-2 lemons, juice of
Combine chicken broth, rice, salt, pepper and bullion cube in a large soup pot. Bring to a boil then reduce heat and simmer until orzo is tender.
In a bowl, beat eggs until fluffy and pale yellow. Stir in lemon juice. Stir about 2 cups of the hot broth into the egg-lemon mixture, so that the eggs do not curdle. Pour the lemon-egg mixture into the rest of the soup and stir. Enjoy!
Greek Recipes
Thinking about soup has made me think about my favorite soup, Avgolemono Soup, a Greek egg-lemon-chicken-rice soup .
My family is Greek so I make traditional Greek foods at home such as:
Avgolemono Soup (egg-lemon-chicken-rice soup)
Spanakopeta (spinach peta)
Batsaria (layered spinach peta)
Tyropeta (cheese peta)
Psari Plaki (baked fish and vegetables)
Souvlakia (Sish-ke-bob)
Stuffed Tomatoes and Peppers
Beef Stew
Sarmades (stuffed cabbage leaves)
Spinach and Lima Bean Casserole
Green Beans in Tomato Sauce
Tsoureki (Easter Bread)
There are a million more recipes I would like to try to make that I ate growing up but haven't attempted yet for my family.
I also want to try my hand at some at the deserts! I love Bakalava, Galaktobouriko, and Theples but I've never attempted to make my own!
Quick Traditional Chicken Noodle Soup
This is a very quick chicken noodle soup. It took about 1/2 a hour to make. This recipe was very good, and it had a hint of sweetness to it. My own recipe is similar to this except I don't use dill and instead I use oregano, parsley, basil, and garlic.
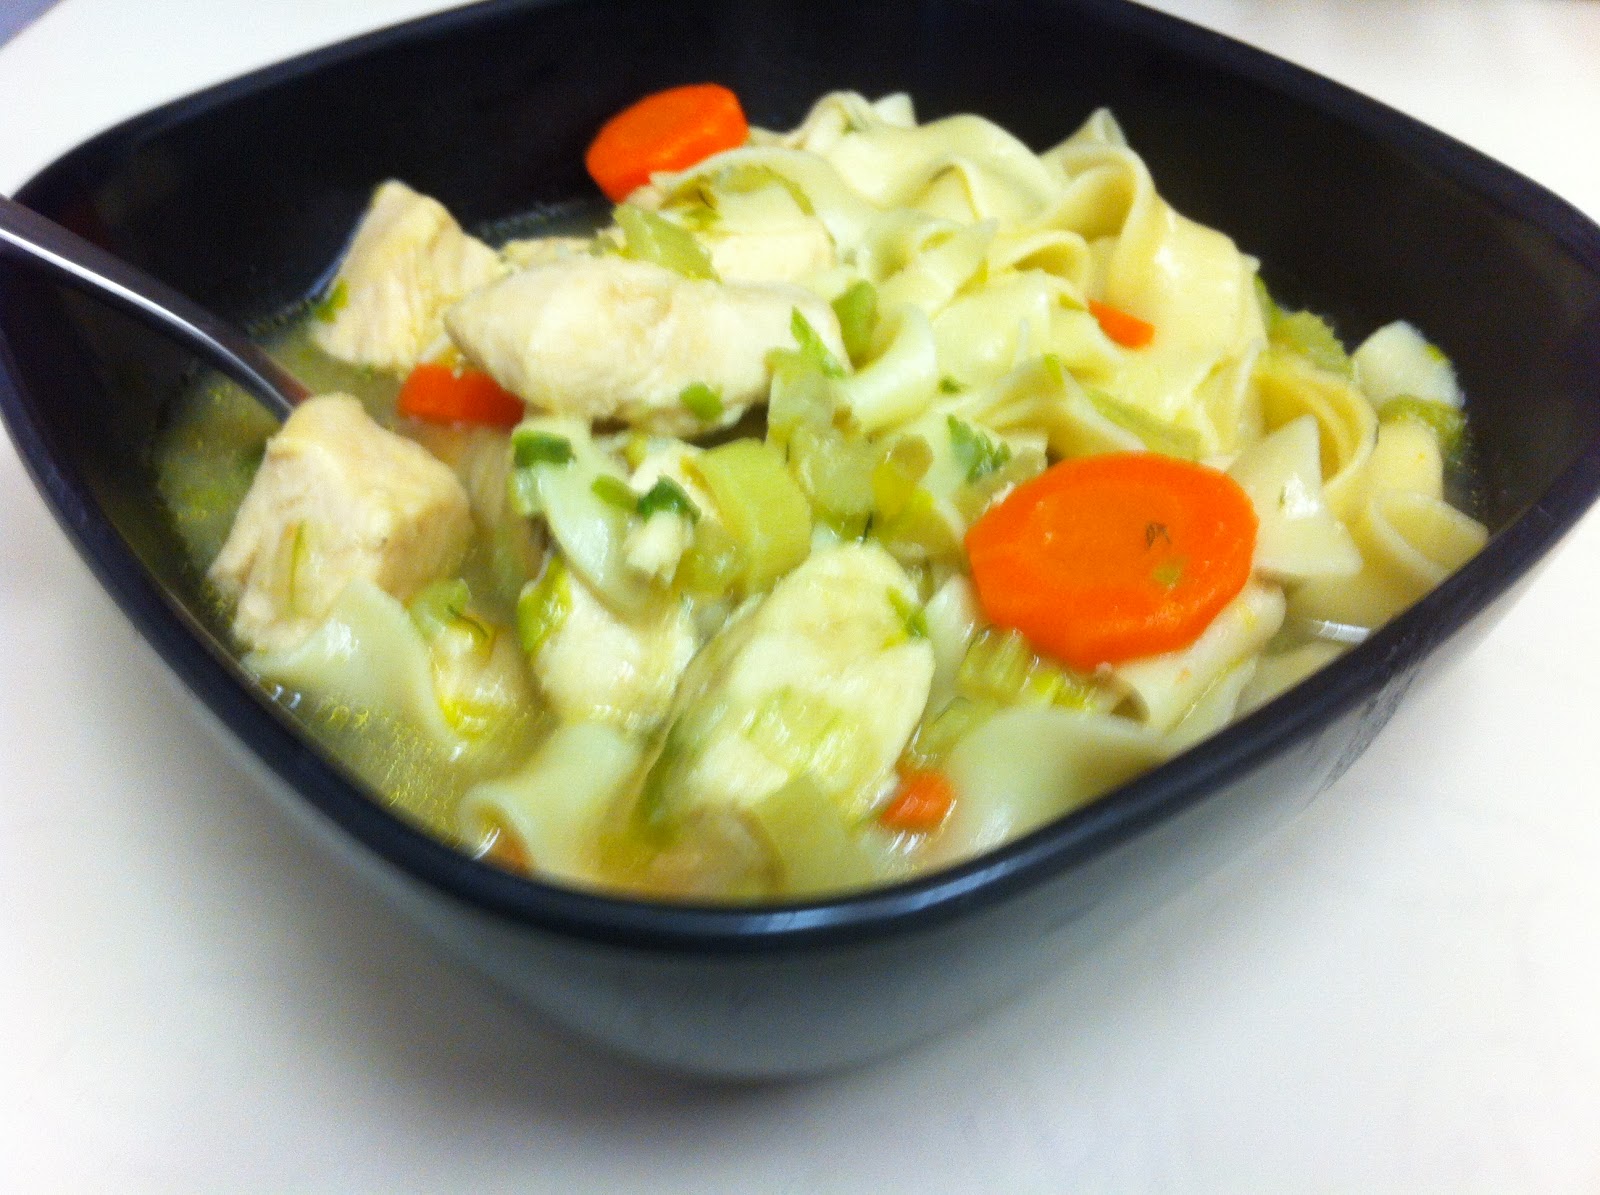
2 tablespoons olive oil
5-6 Celery ribs from heart to leafy tops, chopped
3-4 medium carrots, thinly slices
1 large onion chopped
1 bay leaf
salt and pepper to taste
8-10 cups chicken stock (recipe called for 8 but it was very thick so I added 2 more cups)
1/2 pound egg noodles
1 pound chicken, cut into bite-sized pieces
1/4 cup chopped dill
Heat the olive oil in a large soup pot over medium-high heat. Add the chicken and cook until no longer pink. Add the celery, carrots, onions, bay leaf and salt and pepper, to taste. Cook the vegetables until tender, about 10 minutes. Add the chicken stock and bring to a boil. Add in the egg noodles and simmer for 10 minutes, until noodles are tender. Stir in the dill and discard the bay leaf. Enjoy!
Recipe adapted from the book: Rachael Ray Yum-O The Family Cookbook. Copyright © 2008 by Yum-o! Published by Clarkson Potter/Publishers, an imprint of the Crown Publishing Group, a division of Random House, Inc., New York.
Rainbow Jello
Happy St. Patrick's Day!
Today I didn't do much cooking. For lunch, we made frozen corn dogs and green beans (gold nuggets and hills of green). I'm so corny, lol!

This wasn't hard, just time consuming. To make this, you have to make each layer individually and let it firm before adding the next layer. I used the 'quick set' method and was able to make this in about 3 hours with about 15 minutes of work.

Ingredients:
Jello mixes:
1 red (cherry or strawberry)
1 orange
1 yellow (lemon)
2 green (lime)
1 dark red (black cherry)
blue food coloring
water
ice
Start by making dark red jello, according to the package, but add a few drops of blue food coloring until it looks purple. Pour the jello into the glasses and let is set in the fridge for 30 minutes. I recommend setting them on a cookie sheet or a plate to make getting them in and out of the fridge easier and quicker.
After 30 minutes, make 1 package of green jello, according to the package, but add a lot of blue food coloring until it reaches the desired shade of blue. Pour* the jello into the glasses and let is set in the fridge for 30 minutes.
For the rest of the colors, make the jello, according to the package, and pour* into the glasses and let is set in the fridge for 30 minutes. Repeat until finished layering all colors. After finishing the red layer, let the jello firm up for at least an hour.
*I do recommend spooning the liquid into the glasses because pouring can break the layer beneath it. Or another method I did was I held the spoon in the glass and poured the liquid onto the spoon using it like an impact buffer.
Saturday, March 17, 2012
Living in Alaska
Shoveling - not fun but a great work out!
Cold - just sucks... its sad when 20°F feels warm and 30°F is going coatless weather!!
Snow - fun, but gets old! It's been snowing since mid-October and look how much snow is still on the ground mid-March!
Nature - Just stunningly beautiful! Those humongous mountains and the trees, even all the pure white snow... it's breathtaking!
Wildlife - awesome.... especially when a moose walks down your street!!!


Since I've never posted any of my Alaska pictures... let me include some of my favorites here!
These are from September 2011 when I first moved here!


Here's a photo of a 3:30pm sunset! This was taken in December when the sun rises about 10am and sets about 3:30!

And here is one of my absolute favorites! I took this in January right after it snowed heavily... all the trees were perfectly dusted with snow!

Cold - just sucks... its sad when 20°F feels warm and 30°F is going coatless weather!!
Snow - fun, but gets old! It's been snowing since mid-October and look how much snow is still on the ground mid-March!
Nature - Just stunningly beautiful! Those humongous mountains and the trees, even all the pure white snow... it's breathtaking!
Wildlife - awesome.... especially when a moose walks down your street!!!


Since I've never posted any of my Alaska pictures... let me include some of my favorites here!
These are from September 2011 when I first moved here!


Here's the view from my front yard!

It started to snow about a month after I got here so I have a lot of snow pictures... here are some of my favorites.


Here's a photo of a 3:30pm sunset! This was taken in December when the sun rises about 10am and sets about 3:30!

And here is one of my absolute favorites! I took this in January right after it snowed heavily... all the trees were perfectly dusted with snow!

BLT Spread
This spread was delicious. The leeks oniony flavor was a bit strong for my taste so I will probably use a little less leek next time.


4 slices of bacon, chopped, any kind (recipe said turkey bacon, I used real bacon, vegetarians could use tofu bacon)
1 small leek (or 1/4-1/2 normal sized leek, depending on taste), white and tender green parts, quartered and finely chopped
salt and pepper, to taste
8 ounces cream cheese, at room temperature
1 plum tomato (or about 1/2 a small-medium sized slicing tomato), seeded and finely chopped
Drizzle a pan with olive oil and saute the leeks until tender, about 2-3 minutes*. Season with salt and pepper.
Mix bacon, leeks, and tomatoes in a bowl and fold in the cream cheese until well combined. Enjoy.
*I choose not to cook my leeks and added them raw because I didn't want to add a bunch of oil to the mix since I was already using regular greasy bacon. I also liked the crunch of the leeks. I also did not add any salt or pepper. It tasted wonderful with raw leeks and I really don't think it needed any extra salt since cream cheese is salty enough.
Recipe adapted from the book: Rachael Ray Yum-O The Family Cookbook. Copyright © 2008 by Yum-o! Published by Clarkson Potter/Publishers, an imprint of the Crown Publishing Group, a division of Random House, Inc., New York.
Thursday, March 15, 2012
Old Fashioned Fun
 My 7 year old daughter is getting addicted to the computer and television! It's gotten worse in Alaska since its not always the best weather to be outside. Well, the weather should be warming soon, or at least I hope it will, so I plan to introduce her to some old fashioned fun as well as teach her some skills. We're planning to do a whole bunch of old fashioned activities with her, and our 2 year old can participate with some. We got our activities from The Daring Book for Girls by Andrea J. Buchanan and Miriam Peskowitz and The Dangerous Book for Boys by Gonn Iggulden and Hal Iggulden.
 We are using both books because I like the activities in both books and I don;t believe children should be divided because of gender. The boys book has plans to make a tree house, directions to make a bow and arrow, astronomy and stargazing, and more. The girls book explains how to build a campfire, make your own paper, make peach pit rings, and more. My daughter is a tomboy and would enjoy activities in both books!
I think the activities I'm mostly excited about is building a tree house and a go-cart. I'm already planning the treehouse since we can't actually put it in a tree, but instead it will be raised off the ground with supports. Additionally, since we move frequently and we don't want to have to leave it behind, we are going to construct it in a way to be disassembled when we have to move. We're also going to have to make our own assembly instructions! I can't wait until the weather gets warmer!!!!!
My daughter is also excited because we are going to give her 'badges' for completing activities! She loves collecting stuff and that is a plus for completing an activity!
Chili-Cheese Dogs in Beach Blankets
These were AWESOME! I don't think I will ever make just 'pigs in a blanket' anymore! I've made these twice this week. I made these for the first time for my family for lunch and everyone wanted more! And I made them again for our weekly D&D night with a group of friends...
Yes, we are nerdy like that :) but everyone is nerdy in some way... just pick your favorite thing in the world and add nerd to the end! I have always been a nerd... I started as an art-nerd, been one since birth :) Then I became a sci-fi fantasy show/book nerd.... it began with Hercules and Xena and then my ALL TIME FAVORITE, Stargate SG-1 (I love Daniel) and I love LOTR! I'm a bit of a history-nerd too I guess, I love history channel and reading historical-fiction! My favorite book series, narrowed down to three, are the Sword of Truth Series, Sookie Stackhouse series, and Pink Carnation series. So I guess I'm a series nerd too... I have a series addiction, whether its shows or books! Well, there's my author tidbit of the week :)
Now back to food...

Chili-Cheese Dogs in Beach Blankets
1 teaspoon olive oil
1/2 pound ground beef (1/2 lb ground beef per roll of crust/crescents, I made 3 for D&D night and used 1 1/2 lbs)
1 tablespoon chili powder
1 teaspoon granulated garlic
2 teaspoons dehydrated onion
salt and pepper to taste
2 tablespoons tomato paste and 1/4 cup water (I was out of tomato paste so I substituted pasta sauce and no water)
1 tube refrigerated pizza dough (or crescent dough)
8 hot dogs (more or less depending on length, bun sized may need to be cut in half)
Preheat oven to 425°F. Heat oil in a pot over medium-high heat and brown the ground beef, about 6-7 minutes. Season the meat with chili powder, garlic, onion, salt and pepper and add the tomato paste and water (or pasta sauce). Turn the heat to low and simmer for 5 minutes then remove from heat.
 Roll out dough. If using pizza crust, roll out and cut the dough so you have 8 equal rectangles. Sprinkle on the cheese and add a few spoonfuls of chili. Set the hot dog on top and roll the pizza crust around the hot dog, sealing everything in (Rachael Ray had the hot dog peaking out but it seems easier to have it completely wrapped up!).
If using crescents divide the crescent into the triangles. Flatten each triangle slightly to make it a little wider. Sprinkle on the cheese and add a few spoonfuls of chili. Set the hot dog on top and fold and roll the crescent dough around everything. The technique I used was I placed everything at the bottom of the crescent triangle leaving a little space from the edge. Pill the bottom up and over and take the two bottom triangle tips and pull them around the sides, like closing a diaper, then pull the pointed tip over and around the filling. It closed in everything well!

Bake for 12-13 minutes, or until golden brown. Enjoy!!!
***I used both of these and they both turned out well (I didn't take a picture of the pizza crust version). I actually think using crescents was easier, at least for me! I think they turned out cuter too! I just thought of a funny use for these since I made the diaper comment... use these for a baby shower using the crescents technique which kind of makes them look diaperish. It's a little weird but it could be cute!!!
Recipe adapted from the book: Rachael Ray Yum-O The Family Cookbook. Copyright © 2008 by Yum-o! Published by Clarkson Potter/Publishers, an imprint of the Crown Publishing Group, a division of Random House, Inc., New York.
Monday, March 12, 2012
Jammin' Jambalaya
This was really good! My eldest daughter gets very excited on nights we do recipes from the Tiana cookbook because she loves the film and loves cajun cooking! She loved helping me make this recipe!

2 large celery stalks, chopped
1 small bell pepper, chopped
2 cloves garlic, peeled and chopped
1/4 teaspoon slat
1/8 teaspoon pepper
1 can chopped tomatoes, undrained
2 cups uncooked white rice
4 cups chicken broth
2 teaspoons Worcestershire sauce
1 teaspoon hot pepper sauce
Heat the olive oil in a large pot and saute the chicken over medium-high heat until thoroughly cooked, about 5 minutes. Reduce heat to medium and stir in the sausage, onion, celery, bell pepper, garlic, salt and pepper. Cook the mixture for 5 minutes, stirring occasionally. Stir in the tomatoes and the uncooked rice then add the chicken broth and bring to a boil. Reduce heat to low and cover, simmer the jambalaya until rice is tender, about 20 minutes. Stir in the Worcestershire sauce and the hot pepper sauce. Bowl it up and enjoy!
Recipe adapted from the book: Disney's The Princess and the Frog Tiana's Cookbook Recipes for Kids. Copyright © 2009 Disney Enterprises, Inc. Published by Disney Press, an Imprint of Disney Book Group.

2 tablespoons olive oil
2 boneless chicken breasts, cut into 1-inch chunks
1/2 pound Andouille sausage, cooked and thinly sliced
1 medium onion, chopped2 large celery stalks, chopped
1 small bell pepper, chopped
2 cloves garlic, peeled and chopped
1/4 teaspoon slat
1/8 teaspoon pepper
1 can chopped tomatoes, undrained
2 cups uncooked white rice
4 cups chicken broth
2 teaspoons Worcestershire sauce
1 teaspoon hot pepper sauce
Heat the olive oil in a large pot and saute the chicken over medium-high heat until thoroughly cooked, about 5 minutes. Reduce heat to medium and stir in the sausage, onion, celery, bell pepper, garlic, salt and pepper. Cook the mixture for 5 minutes, stirring occasionally. Stir in the tomatoes and the uncooked rice then add the chicken broth and bring to a boil. Reduce heat to low and cover, simmer the jambalaya until rice is tender, about 20 minutes. Stir in the Worcestershire sauce and the hot pepper sauce. Bowl it up and enjoy!
Recipe adapted from the book: Disney's The Princess and the Frog Tiana's Cookbook Recipes for Kids. Copyright © 2009 Disney Enterprises, Inc. Published by Disney Press, an Imprint of Disney Book Group.
Tortilla and Tomato Toast
This was a delicious brunch item. We had slept in one day and it was somewhat late for breakfast but early for lunch so we had this, it's kind of like an egg, onion, and potato omelet with toast. This could be perfect for any meal!!!

Tortilla and Tomato Toast Recipe
1/4 cup olive oil
2 medium potatoes, peeled and thinly sliced
1 onion, peeled and thinly sliced
salt
8 eggs
1/4 cup milk
8 slices of crusty bread
2 really ripe tomatoes
 Heat the olive oil in a large oven-safe skillet over medium heat. Add the potatoes and the onions and salt them to taste. Cook the onions and potatoes for about 15 minutes, until they are tender and not brown, turning them about every 2- 3 minutes. Preheat the boiler (if your skillet has silicone on it I would suggest low instead of high. I used high thinking it was at a safe temperature for silicone and it cracked my silicone handle a tad).
 In a bowl, whisk and the eggs and the milk together with salt, to taste. Pour the eggs over the potatoes and onions and let it settle and firm up around the edges (about a minute or less). Place the skillet under the broiler and brown the top until the tortilla is firm and golden (I browned mine a bit because I was worried about taking the eggs out to early and it not being thoroughly cooked). Once golden, remove the tortilla from the broiler and cool, leaving the broiler on.
 Place the bread on a cookie sheet and toast under the broiler. Brush the toasted bread with olive oil. Cut the tomatoes and squish the tomato guts all over the toasted bread and sprinkle with salt. I toasted them again in the oven for about one more minute.
Cut the tortilla into four wedges and serve with 2 slices of tomato toast. Enjoy!
Recipe adapted from the book: Rachael Ray Yum-O The Family Cookbook. Copyright © 2008 by Yum-o! Published by Clarkson Potter/Publishers, an imprint of the Crown Publishing Group, a division of Random House, Inc., New York.
Inside-Out Turkey Bacon Cheeseburgers with Oven O-Rings
These we're good but the spicy brown mustard was a little overpowering, but it might just be me since I'm not a huge mustard fan. The onion rings were a little dry but I think more milk mixture is needed during dipping to make sure they get fully coated or maybe a light spray of pam or olive oil would help them not get so dry.

Inside-Out Turkey Bacon Cheeseburgers with Oven O-Rings Recipe
6 slices of bacon or turkey bacon, chopped*
1 tablespoon olive oil
1 cup corn meal
2 teaspoons chili powder
1 cup all purpose flour, for dredging
1 1/2 cups buttermilk (or substitute 1 and 1/2 tablespoons vinegar or lemon juice and the remainder milk)
1 large sweet onion, sliced 1.2 inch thick and separated into rings
2 pounds ground turkey
salt and pepper, to taste
1/4 cup spicy brown mustard
3/2 cup shredded cheddar cheese
1/2 head lettuce, chopped
1 tomato
Preheat oven to 450°F. Cook bacon in a large skillet over medium heat until crisp, about 3-4 minutes on each side. Remove bacon and let cool on a paper towel. Once cool, chop the bacon and set aside. Add 1 tablespoon of olive oil to the bacon grease in the pan and set aside.
While the bacon is cooking you can work on the onion rings. First, gather three bowls. In bowl one, combine the cornmeal and chili powder. Fill bowl two with flour and bowl three with buttermilk. Dip the onion rings into the buttermilk then dredge in the flour. Dip the onion rings for a second time in the buttermilk (make sure you are thoroughly covering it in buttermilk), then dredge in the cornmeal. Place the fully dipped onion rings on a cookie sheet and bake for 15 to 18 minutes.
 While the onion rings are baking, you can work on the burgers. In a large mixing bowl, combine the ground turkey with the salt, pepper, and the spicy brown mustard. Divide and shape the meat into 4 equal burger patties with a well in the center. Fill the well with 2 tablespoons of cheese and a 1/4 of the bacon then carefully mold the burger around the filling (I don't think I covered the filling well enough because as you can see in the picture it cracked open a bit during cooking!). Place the burgers in the pan and cook over medium-high heat for about 2 minutes on each side then reduce the heat to medium-low and cook the burgers for about 3 minutes on each side. (Do not press down on the burgers as thy cook).
Serve the burgers on top of a bed of lettuce topped with a tomato slice and o-rings on the side. Don't forget to add another vegetable to create a balanced meal.
*The recipe said to use turkey bacon but if I'm going to use bacon in a recipe, its going to be real bacon! I don't even use bacon bits, I always cook up my own and chop it!
Sunday, March 11, 2012
Update
I have updated previous posts with recipes! I've been meaning to do that but I've been busy! Now all my recipe critiques include the recipe I used. My recipes are not identical to the books, I have some altered ingredients and directions, for the original recipes and directions you will just have to buy the books :)
My goal is to post at least 2 recipes a week! If you have any suggestions for which I do next please comment!
Tonight we're doing Inside Out Turkey Bacon Cheeseburgers with Oven O-Rings! YUM!
My goal is to post at least 2 recipes a week! If you have any suggestions for which I do next please comment!
Tonight we're doing Inside Out Turkey Bacon Cheeseburgers with Oven O-Rings! YUM!
Wednesday, March 7, 2012
'Instant' Oatmeal - Apple Cinnamon Oatmeal
This oatmeal was delicious! It made enough for breakfast that day as well as premade breakfasts to store in the fridge! It makes enough for 8 or more servings. We ate about 3 servings the day we made it and I stored 6 cups worth in these containers, which is enough for 2-3 breakfasts for my family.

Apple Cinnamon Oatmeal Recipe
3 cups old-fashioned oatmeal
3 cups skim milk
1/2 cup brown sugar
1/2 teaspoon salt
2 Granny Smith apples, peeled, cored, and chopped
2 teaspoons ground cinnamon
Combine all of the ingredients in a large deep saucepan and bring to a boil over medium-high heat. Once it boils turn the heat down to low and simmer for 15 to 20 minutes, or until the oatmeal is thick and creamy. Remember to stir frequently to avoid the bottom from scorching.
Serve with additional milk, if needed, or cool and refrigerate for later.
Recipe adapted from the book: Rachael Ray Yum-O The Family Cookbook. Copyright © 2008 by Yum-o! Published by Clarkson Potter/Publishers, an imprint of the Crown Publishing Group, a division of Random House, Inc., New York.
Monday, March 5, 2012
Giant Chicken Tost-achos
I love these! These were absolutely delicious! We used Spinach Tortillas and we had to cut them into wedges because we had 12-inch tortillas instead of the 6-inch.

Giant Chicken Tost-achos
Extra Virgin Olive Oil
4 6-inch tortillas
2 cups chopped or shredded cooked chicken
1 cup mild taco sauce or salsa
2 cups shredded cheese, Monterey jack, cheddar, mozzarella
1 cup shredded lettuce
2 scallions
4 rounded spoonfuls of sliced green olives with pimentos
sour cream, for topping (optional)
Preheat oven to 350°F. Lightly brush a little oil onto the tortillas and crisp them in the oven on a baking sheet for about 5 minutes. While the tortillas are crisping, cook the chicken and salsa in a skillet over medium heat, for 5 minutes or until heated through. Once the tortillas are crisp, top them with the saucy chicken and lots of cheese and bake in the oven for another 3-4 minutes, or until the cheese completely melts. Plate up the Tost-achos on plates and top with lettuce, scallions, olives, and sour cream.
Recipe adapted from the book: Rachael Ray Yum-O The Family Cookbook. Copyright © 2008 by Yum-o! Published by Clarkson Potter/Publishers, an imprint of the Crown Publishing Group, a division of Random House, Inc., New York.
Saturday, March 3, 2012
Po' Boy Sandwich
This recipe was delicious!!!! After I decided to make this I realized we had no gravy so we made our own based on a recipe I found online for quick gravy, my recipe can be found here.

Po' Boy Sandwich
Loaf of French bread
Mayonnaise
Shredded lettuce
Tomato slices
Sliced roast beef
1/4+ cup warm beef gravy
Slice the bread lengthwise and lightly toast. Spread mayonnaise on the bottom slice then layer on lettuce, tomato slices, and roast beef. Top with the warm gravy and the top half of the bread. Enjoy!
Recipe adapted from the book: Disney's The Princess and the Frog Tiana's Cookbook Recipes for Kids. Copyright © 2009 Disney Enterprises, Inc. Published by Disney Press, an Imprint of Disney Book Group.
Subscribe to:
Posts (Atom)